Posted by in Kids Craft | Comments Off on Canada Day Crafts
Canada Day Crafts

Celebrate Canada Day this year by enjoying these Canada Day crafts with your children!
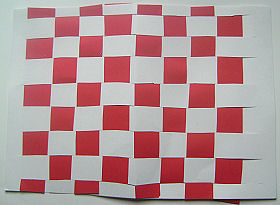
Canada Day Placemat
Your table will look great for Canada Day with these patriotic placemats, and the kids will enjoy helping you to make them! You could ask the children to sign and date them and then laminate them to keep them for next year, if you like.
You will need:
A sheet of white card
Red paper
Instructions:
Fold the card in half lengthways. Cut long lines in the card about 1 inch apart and about 1 inch from the edge of the card.
Cut the paper into strips about 1 inch wide. Take a strip of paper and pass it under the card and then up through the first slit, down through the second and back up through the third and so on until you reach the other side of the card. Push it up so it sits as close to the top of the red card as it can reach. Repeat with a second strip of paper, starting the other way, down through the first slit and up through the second and so on. Keep weaving until the card is full.
Laminating will protect your mat.
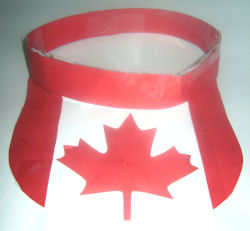
Canada Day Sun Visor
The perfect way to keep the sun out of your eyes at your Canada Day picnic!
You will need:
Red card
White card
Glue stick
Sticky tape
Cut a strip of red card 1.5inches (3cm) wide and long enough to fit around your head. Measure it around your head and tape to secure.
From the white card, cut a rectangle approximately 8 by 6 inches (20 by 15 cm). Cut the corners at one end into curves. This is the front of your visor. Either draw your own or use our maple leaf template to cut a maple leaf out of red card. Glue it to the front of the visor. Either side of the maple leaf glue a rectangle of red card. Trim these to the edge of the visor.
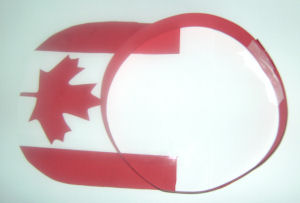
To fit the visor to the band, put the band on top of the visor where you want it go and mark its position (see photo below).
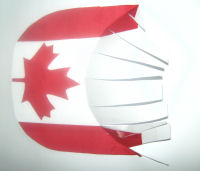
Now, from the back of the visor, cut slits up to the line to make tabs, as shown:
Put the band back on the line and fold and tape the tabs to the inside. Trim any of the tabs that stick out. Glue securely, and wait until the glue dries before you wear your creation!


